
Paste (instructions on how to make this below)
Newspaper
Cardboard paper towel roll
Heavy-duty Cardboard
Glue gun
Paint
Instructions:
Glue--
1/4 cup of flour
1 cup of water (divided)
Elmer's Glue
Salt
1 cup of water (divided)
Elmer's Glue
Salt
- Start heating up 1/2 cup of water on the stove.
- In a seperate bowl, measure 1/4 cup of flour.
- Pour 1/2 cup of cold water into the same bowl.
- Whisk to remove lumps.
- Once water on stove is boiling, pour mixture into pot.
- Stir constantly and stop as soon as mixture begins to bowl.
- Remove from heat.
- Add about 1 Tb of salt. (This will help keep the paste last longer before getting moldy.)
- Allow to cool.
- Squirt some Elmer's Glue into the mixture. The paste alone should work, but I like to use this as a back up. Just in case.
- Strip up some old newspapers--some in strips and some in small pieces.
- You're ready to start pasting! Make sure to store paste in refrigerator when finished. Lasts about two weeks.
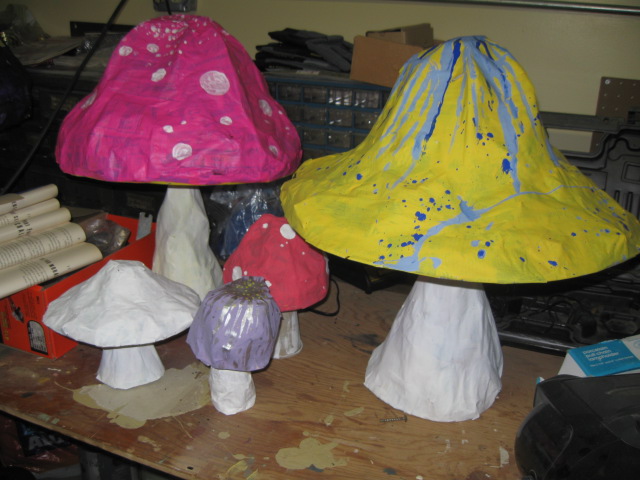
Mushroom--
1) Cut out a medium circle from cardboard. This will be the base of the mushroom. It should be fairly wide depending on how big you want the cap to be.
2) Take a paper towel roll, and with a glue gun, glue one end in the center of the cardboard base. Unplug the glue gun. You'll still need it, but the next steps takes some time to finish.
3) Crumble up some newspaper and place it along the cardboard tube. You may want to use tape to help mold the base into the shape you want.

5) Dip your strips into paste. Get the excess glue off by running the newspaper between two fingers. The paper should not be gloppy, but still wet enough to work with.
6) Apply the newspaper as you see in this picture. We are forming the stem as we do so.


9) Once stem is dry, measure the diameter of the top. This may or may not be different than the diameter of the paper towel roll depending on how you used your strips of newspaper.
10) Cut out a hole with the same diameter in the center of your cardboard circle.


14) Once you get a shape you like, cut out seven more. You can use the first as a pattern piece. I recommend giving one piece a "lip" on top (see picture in step #12). This prevents the newspaper from sinking into the hole made by the cardboard tube during later steps. This is one of the first times I'm trying to make a large mushroom with less than eight ribs and it came out okay, but not as good as the others.
15) Using a glue gun, glue these rib pieces to the crown piece. Try to space them out evenly. The reason why you need heavy-duty cardboard here is because if you use lightweight, it will not hold its shape as well.

17) Apply paste/newspaper over crumpled newspaper. Go section by section.


21) Again, let dry before painting.

23) And you're done!


I love these mushrooms. Some friends did this for my birthday/ Alice in Wonderland tea party. The thing was five feet tall. It fell off of a friend's truck on the five freeway during a rain storm. It still made it to the party, and still looked awesome. That thing was magical.
ReplyDeleteThat is amazing! If you have a picture, I'll put it in the post. Glad you had fun! :)
DeleteHi There,
ReplyDeleteThank you for sharing the knowledgeable blog with us I hope that you will post many more blog with us:-
Buy Alice Mushroom Milk Chocolate, you’re looking to take a trip to a land far beyond your imagination or want to enhance your day to day.
Email:info@psychedeliccurestore.com
Click here for more information:- more info
Very good website, thank you.
ReplyDeletePaper Mache Pen Holders Green Colour
Order Handicrafts Products
Handicrafts Products Online