Pages

Showing posts with label Better Homes and Gardens. Show all posts

Monday, September 12, 2011

Advice for a Halloween Party on a Budget (Hopefully Under $100)

It's that time of year again, and you decide you want to plan a huge party....but your pockets only have a couple pennies in them. Well, so far, I've been doing fantastic with keeping on budget for my party. I have spent a whopping total of $18 on my party so far and have boxes of decorations already set. So here's some tips I have for party planning.

1) Plan Waaaaay Ahead:
Why plan months in advance? For several reasons. First, because the day of your party tends to sneak up on you, and if you aren't preparing well ahead of time, then you have to rush to finish everything and it's a slapdash mess. Second, because you have time to wait for things to go on sale. This is the key to having a good party. Sure, you can have a great time on a last minute fling, but this will take a lot of stress on you as the party planner.

2) Garage sale:
If you plan enough in advance, you will be able to garage sale during the summer months. Many sales I went to over this summer had Halloween items. I was also able to find items that fit in with my Alice in Wonderland theme thanks to me deciding on the theme ahead of time. Some of the items I bought were candles (shaped in card suits); books (which I reshaped into flying books); fabric; acrylic paints; black, paper lanterns (brand new); flickering lighting effects (also brand new, original price $20, got for $2). That's not mentioning the items I saw but didn't buy like fog machines and other Halloween decorations. You can save so much by buying used items at garage sales, it's worth planning ahead.

3) Secret Shopping
By contract, I can't tell you what company shops for what stores. What I can tell you is that by secret shopping, you can pick up items for a small reimbursement (about $2-5). Though it's small, these add up. Plus, you'll often get a shop fee, separate from the item reimbursement fee. You could end up making money on the deal in the end, which you can put towards something else. 
Source: Metro Site Inspections
Links to check out: Volition Forums, KSS International, Corporate Research International

These will start you off. KSS International and CRI are mystery shopping companies. They have a variety of stores all over the US. The pay for these is below average, but they are good for beginners. The forums are great for looking for new companies and getting into contact with other shoppers.

4) Make Use of the Free Crafting Sites
There are plenty of books you can find at the library and websites that offer crafts. All of these are free. Sometimes you need to sign up first, and others are just made available to you. Crafting your own items makes things much cheaper, as well as unique to your party.

Here are some of my favorite resources to consult during the planning. Yes, I know these make me sound like a stereotypical, middle-aged housewife. Or my mother. But there are some really great ideas on these sites:

Martha Stewart
Better Homes and Gardens - Don't bother buy the magazine; it's a waste of money. Everything you need and more is on their site. You'll just have to get an account

5) Papier-Mâché
I highly recommend papier-mache when making decorations. Not only is this easy, but highly adaptable. You can even make a pinata if you so wish.

My Recipe:

1/4 cup of flour
1 cup of water (divided)
Elmer's Glue
Salt
Newspaper

1) Start heating up 1/2 cup of water on the stove.
2) In a seperate bowl, measure 1/4 cup of flour.
3) Pour 1/2 cup of cold water into the same bowl.
4) Whisk to remove lumps.
5) Once water on stove is boiling, pour mixture into pot.
6) Stir constantly and stop as soon as mixture begins to bowl.
7) Remove from heat.
8) Add about 1 Tb of salt. (This will help keep the paste last longer before getting moldy.)
9) Allow to cool.
10) Squirt some Elmer's Glue into the mixture. The paste alone should work, but I like to use this as a back up. Just in case.
11) Strip up some old newspapers--some in strips and some in small pieces.
12) You're ready to start pasting! Make sure to store paste in refrigerator when finished. Lasts about one and a half weeks. If you want to make something that is circular, past over an inflated balloon, then pop the balloon when finished.

I will be doing a full tutorial on how to make mushrooms (for my Alice in Wonderland party!) all from trash and this paste recipe.

6) Bargain Shop - Non-Food Items
In order to really stretch your dollars, you need to play it smart. You can hit up the Halloween sales that sometimes come, or, if you've planned well ahead, you can hit some great deals.

Dollar Store - The dollar store is another great place to look for deals. Need trash bags for your party? Get 'em here. Need fake flowers for decorations? Get 'em here. Very rarely is there a time when you should not get something from the dollar store, especially if the item is something solely for this one party. Before you try going to a more expensive store, it's probably a good idea to check here first. If it's not what you're looking for or the quality is crap, then you can go to bigger and better retail stores. 

Party City - Definitely give their store and website a try. Many of their decoration items are fairly cheap. Their costumes are a little pricey, so make sure to shop their clearance. There you can find full adult costumes (men and women) for as little as $15-30 and child costumes for $5-15. Worried about the shipping? My advice: bide your time. Party City often releases a free shipping code. You can check back on their site to find this code (usually at the top), or you can join their mailing list for updates (join by filling out the form at the bottom of the page).

Hobby Lobby - this is an expensive store for a bunch of Chinese-made crap if you don't shop right. What you need to do is play it smart and never buy full price! Before you go to the store, make sure to go on their website to check what's currently on sale and see if it's anything you'll need. Next, check and see what coupon they are offering. Fairly often they have a coupon for 40% a full price item, which can take quite a bit off your total. I used my coupon for my costume fabric and saved over $10! Check out their leftover fabric in the sewing department if you need it for a craft. These are often located in bins near the back; the fabric is rolled up and has a white sticker wrapped around the center. Again, check the clearance in the back. Not all Hobby Lobbies have clearances, but if yours does, make sure to do some digging.

Goodwill/Thrift Stores - Around Halloween, Goodwills will put out all their Halloween decorations, and I can almost guarantee you'll find something. 


7) Bargain Shop - Food Items
Food is probably going to be the most expensive out of everything you're doing for your party. This is where rule #1 fails because you cannot buy food well in advance and still have it be safe and taste good. Catering saves you time, but can get really expensive and be of unknown quality.

My advice is to just do the best you can with food. Know anyone who works for a restaurant? Ask them for help if they get discounts, or you can ask some guests to bring in small, easy items like desserts, chips, or soda. By spreading out the food costs, it will not only make it easier on you price-wise, it will also be a time saver since that's one last dish you'll have to prepare.


8) Set a Budget and Stick to It
Plan a budget and keep to it. Don't be even tempted to go over. The moment you break your budget, you'll be more tempted in the future you'll be to spend again. Just don't do it! Plan, plan, plan.

I hope that helps a little! A little creativity and time will get you far and will save you money! I'm planning on making a tutorial for papier-mâché crafts, specifically how to make Alice in Wonderland mushrooms. See you in a bit!

Friday, September 2, 2011

Wacky Mad Hatter Hat -- Detailed, Step-by-Step Supplement w/Pictures and Alterations

This is a pattern and tutorial from Better Homes and Gardens. You can find the original here and here along with the basic patterns. You may need to create an account before you have access to their website and patterns. (It's free so don't worry.) I found that I didn't like their instructions; they were too confusing. So here is a supplement--key word: supplement--to their instructions. No copyright infringement intended; I just want to help people out with this craft.

Skill level: Moderate
Time estimation: ~1.0 - 1.5 hours


Updated supply list
I found I didn't need certain items or the ways they bound certain pieces didn't hold as well. Here is a better list detailing what's needed:
  1. Old box of lightweight cardboard. Preferably one without a lot of folds. Folds will weaken the board and leave bumps on your hat. A good example would be a large cereal box, but the ideal would be something like a poster board.
  2. Fusible interfacing Medium-weight would be best probably. I used a light-weight interfacing, though
  3. Non-fusible interfacing ~Optional~ For more advance sewers and crafters who do not want to spend extra money on the more expensive fusible.
  4. Fabric about 1/4 yard to 1/2 yard, depending on how large you plan on making your hat. Half a yard will be for quite large hats. Now would be a great time to use up those scrap pieces! I used a piece of stretch, panne velvet fabric. This allowed me to compensate for mistakes while experimenting with patterns and prevented the fabric from fraying on the edges.
  5. Pins
  6. Needle and thread Thread should match the fabric.
  7. Wire or Floral wire Thicker wire should be used if you want to really alter your hat's brim shape. Floral wire will help keep the shape of the brim but will give you only a little bit of molding power.
  8. Hot glue gun
  9. Clothes iron
  10. Sewing machine
  11. Marker 
  12. Tailor's tape 
  13. Scissors 
  14. Rotary blade ~Optional~


Updated Instructions with Pictures
I don't want to copyright infringe anything here, so these are my tips and advice on how to make this hat an alternative way. I will also give you instructions on how to alter the patterns so you can change the shape and look of your hat. Please, please, please go and sign up on Better Homes and Gardens to see how they do their project first. This will make it much easier to understand why I'm doing things this way.


1) Making the band pattern--- Make your patterns from the ones the website gives you. They say to blow up the pieces 400%. You can do this on your own, but if you are worried about the curved edges, you can easily print them out as guidelines. How neat your curves are really doesn't matter because you can always go back later and straighten them out in step 9. I drew my band pattern directly onto the cardboard with a marker to save time. You can do this, too, because no one will see the cardboard in the end product.

Altering the band pattern:
Let's say you don't like the patterns they gave you. Well, that's a really easy fix. 
Here is the basic pattern. I've labeled some areas of the pattern to show what that section will become once completed. The height is colored in purple. The crown/top is the largest curve in this picture, and the curve that will belong to the bottom of the band is the other curve. Whatever you may do to the pattern, the height (in purple) must be the same length! This pattern calls for about 7'', feel free to make it taller if you like.
A rectangle will make a perfect cylinder for your hat. This is good for top hats.

 By making almost a semi-circle, you will get a large flair with your hat. This will be very top heavy and very narrow on the bottom. This is good if you're going for a very cartoony look to your hat.

2) Cut out band pattern--- Using your newly created pattern or the pattern supplied on the Better Homes and Gardens website, cut out one band pattern from the lightweight cardboard. 

3) Altering the crown and brim patterns--- Using a flexible ruler such as a tailor's tape, do your best to measure the crown's curved line (the largest curve). How long it is will be the circumference of your crown pattern. Instead of struggling with the tape and getting sloppy lines to make the circle pattern for your crown piece, just take the number you measured and divide it by π. Take this number and add one inch. This will be the diameter of the crown.  

You do not have to have cardboard pieces for these patterns. You can use tissue paper, newspaper (iron newspaper first to avoid ink from spreading to your fabric and to straighten out crinkles. Butlers used a similar technique for their masters back in the day), or regular printing paper....whatever works. I used cardboard and butcher paper.

Do the same thing for the brim's section of the band pattern. Only in addition to the diameter you've calculated, add 2x the width you wish for your brim. For example, your diameter is 8'' and you want your brim to be 4''. You would add an additional 8'' to the 8'' diameter to compensate. 

Now you have all your pattern pieces and are set for the rest of the project!

4) Cut out crown and band fabric piece--- Using scissors or a rotary blade, cut out one piece of fabric with your crown pattern piece. Be careful not to cut yourself! Cutting out circular pieces can be tricky, especially with a rotary blade. At the same time, using your band pattern piece, cut out one piece of fabric. Add about 0.5'' around the band pattern to make room for a hem later.
5) Cut out fusible interfacing--- Using the same crown pattern piece, cut out one piece of fusible interfacing.

6) Iron fusible interfacing to fabric piece--- Iron the interfacing to the WRONG side of the fabric. Beginners, place the side of the interfacing with all the bumps closest to the fabric. 
.
7) Clip the edges of the circle--- Going about 0.5'' deep, snip around the circle. Clipping will eliminate bulk when we press this on our cone in step 10.
It helps to use a ruler and marker to mark the notches so you don't go too deep
8) Prepare hot glue gun--- Plug in the gun to get it warm.

9) Wrap the band into a cylinder--- Curl the cardboard around. Line up the purple, height lines as best as you can. Take the hot glue gun and run a stream of glue along the edge of one side. Press the other side to the glue. How much you overlap doesn't matter, but try to keep it under one inch on each side. 

Now's a good time to take your scissors and correct any areas where the cone isn't level. You can test this by resting both ends on a table--it should be able to stand on its own. 


10) Glue cylinder top to crown--- Lay the crown piece bottom-side up/interfacing up. Take your band. Along the side for the crown, run hot glue around the circumference. Quickly press this into the center of the crown piece.
11) Hem the band piece--- Using the hot glue gun again, hem the band piece's fabric. Leave one of the straight sides un-hemmed.
11) Glue band piece to cardboard--- Find the seam of the cardboard. Using the hot glue gun, run some glue along the length. Press the un-hemmed side to the glue. Make sure to press the wrong side against the cardboard, leaving the right side of the fabric on the outside. Also make sure to not turn the fabric upside down. Match crown with crown curves, brim with brim curves.
The glue will be hot. Use maker to press fabric to cardboard.

12) Make the brim--- Grab your pattern for the brim piece. Cut out two fabric pieces and two interfacing pieces. If you are new to interfacing, opt for the fusible again. If you feel you're a decent sewer, stick with the non-fusible to save it for other projects. If you use fusible, remember to iron interfacing to both pieces of fabric before continuing.
13) Cut an "X" into one brim piece--- Cut an "X" into one piece.
13) Sewing time!--- Press the correct sides together. Pin edges. You'll have to leave a small opening for wire later. I like to mark these with double pins so I know when to stop sewing. Sew 0.25'' away from the edge. Flip the piece inside-out. Check to make sure you sewed all edges. Correct if you can see interfacing.
14) Making casing for wire--- Turn the brim right-side out. Sew using a matching thread a casing. Sew about 3/8'' away from the edge. Complete the entire circle.
15) Wire--- Loop the end of the wire as pictured below if possible. This will keep it from catching. Feed it into the casing you just made. Cut off the end once finished. End the wire by twisting it into the beginning of the wire, or loop it again. I am using floral wire because that's all I have at the moment.
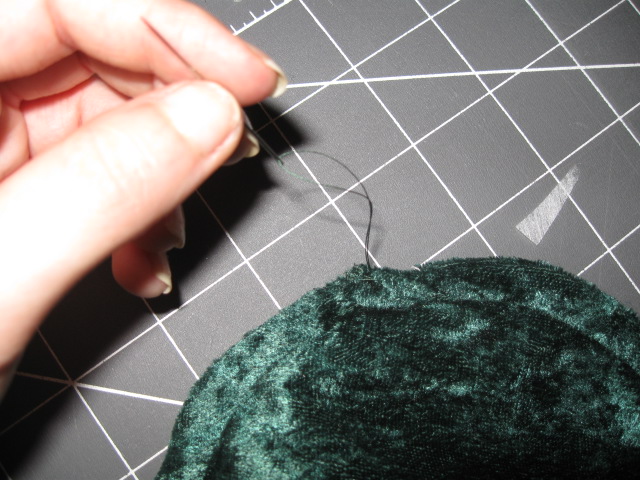
16) Slipstich close--- Using a needle and matching thread, slipstick opening closed.
17) Attach brim to rest of hat--- With a longer piece of thread, attach the brim to the rest of the hat using a slipstich. Make sure to pull the fabric on the band taught to avoid wrinkles. I found it was easiest to rest the hat upside-down in my lap as I stitched. Click the pictures below for larger shots.
 18) COMPLETE! 
19) Add decorations and you're finished!

Changes: I made several changes from the original. For starters, I swapped the glues, interfacing, and also altered the pattern slightly. I also changed the order around because when I followed their guidelines, I found some ways they could have been edited to make it simpler. Thanks again! Make sure to check out the original site at Better Homes and Gardens.


Related Posts Plugin for WordPress, Blogger...